
There is a version of this project that takes an afternoon. You buy some velcro straps, route each cable under the desk, zip-tie the excess, done. It looks great on day one. By week three, someone has raised their desk to standing height, the cable sleeve has pulled taut against the leg frame, and the HDMI port on their monitor is hanging by a thread.
Now multiply that by 100 desks. Multiply the broken connectors, the IT tickets, the tripping hazards, the frayed power cables dragging across floor tiles. Multiply the liability.
Sit/stand desk cable management is not a tidy-desk project. At commercial scale — 20, 50, or 100 height-adjustable desks in an open-plan office — it is an infrastructure project. And the gap between offices that treat it like one and offices that don’t shows up not in how things look on installation day, but in what happens to the system six months later when the desk moves 400 times and nobody has thought about what happens to the cables every single time it does.
This guide covers everything: the physics of why sit/stand desks are uniquely punishing on cabling, the three mistakes almost every office makes regardless of size, the correct approach at each scale, and the material decisions that separate a system that lasts five years from one that starts failing in five weeks.
Why Sit/Stand Desks Are Different; The Physics Nobody Explains
A cable on a fixed desk is a static object. You route it once, secure it once, and it stays exactly where you put it for the life of the desk. The only force it ever experiences is gravity.
A cable on a height-adjustable desk is a dynamic system. Every time the desk moves from sitting height (roughly 70cm) to standing height (roughly 115cm) the cable stack must accommodate 40 to 50 centimetres of vertical travel. Over a standard workday in a sit/stand-enabled office, the average desk moves four to eight times. Over a year, that’s roughly 1,000 to 2,000 full height cycles per desk.
Now think about what that means for a cable that was routed tightly, without slack, in a fixed path. Every cycle applies tension to every connector. Every cycle flexes the cable at the same bend point. The insulation fatigues. The connector housing loosens. The internal conductors fracture not all at once, but progressively, in a failure mode that shows up as an intermittent connection that your IT helpdesk spends hours troubleshooting before anyone checks the cable.
The number that changes everything: every cable that travels with a sit/stand desk needs a minimum of 50–60cm of free loop slack the “service loop” to absorb the full vertical travel range without ever going taut. Most offices provide zero. Some provide 10cm. Almost none provide the full amount, because the full amount looks messy if you don’t route it correctly, and so the instinct is to tighten it up. That instinct is what drives every cable failure on a sit/stand desk.
Everything in this guide flows from that one principle. The slack must exist. The question is how to contain it so it looks professional, doesn’t create hazards, and survives a thousand desk cycles without degrading.
The Three Mistakes Every Office Makes Regardless of Size
Mistake #1: Treating the Power Bar as the Cable Management Solution
The most common commercial office cable management approach: plug a power bar into the floor outlet, velcro it to the underside of the desk, plug everything in, call it done. The power bar is doing the work of a cable management system but it’s not a cable management system. It’s a power distribution device.
When the desk moves, the power bar moves with it. The power cord from the bar to the wall outlet rarely more than 1.8 metres goes taut at standing height in any desk more than 1 metre from the floor outlet. At full extension, that cord is under tension. The outlet receptacle on the wall is experiencing a lateral pull force it was never rated for. In an office with 50 desks, this is happening simultaneously across the entire floor every time someone stands up.
The fix is not a longer power cord. The fix is separating the desk-mounted power distribution from the floor-level cable containment a distinction covered in the three-zone system below.
Mistake #2: Using Zip Ties on Dynamic Cable Runs
Zip ties are an excellent tool for static cable management server rooms, fixed workstations, structured cabling runs in ceilings and walls. They are among the worst tools you can use on a sit/stand desk, for a reason almost nobody explains: zip ties create fixed constraint points.
A cable that is zip-tied at three points along the desk leg now has a defined path that cannot vary as the desk changes height. If the cable has insufficient slack and most do it flexes at the constraint points during every desk cycle. The tighter the zip tie, the more concentrated the flex. Cable insulation fails at flex points faster than anywhere else. And when it eventually fails, the failure is inside the zip tie invisible until the cable stops working entirely.
Replace every zip tie on a dynamic cable run with a hook-and-loop (velcro) fastener. Velcro allows the cable to shift slightly at the constraint point during movement, distributing the flex stress across a wider section of cable rather than concentrating it. It also makes future cable changes — adding a monitor, replacing a laptop, reconfiguring a desk — a 10-second job rather than a wire-cutting exercise.
Mistake #3: Buying Cables at Desk Length, Not at Travel Length
When offices bulk-order cables for a fleet of sit/stand desks, they typically measure the distance from the device on the desk to the port it connects to — monitor to PC, PC to switch, laptop to power brick — and order cables that length. This produces a beautifully tidy desk at sitting height with exactly zero slack for movement.
The correct cable specification for any cable that travels with the desk — monitor cables, USB-C display cables, laptop charging cables — adds the full 50–60cm service loop to whatever the static connection distance requires. A cable that needs 1 metre to reach at sitting height needs 1.5 to 1.6 metres to reach safely at full standing height with a proper service loop. Order to travel length, not to desk length. It’s a detail that costs almost nothing at procurement time and prevents significant recurring IT costs over the life of the desk fleet.
The Three-Zone System: The Professional Framework for Sit/Stand Cable Management
Every correctly managed sit/stand desk installation — whether it’s 5 desks or 500 — is designed around three distinct zones, each with its own cable behaviour, hardware requirements, and failure modes. Designing for all three zones is what separates a system that runs clean for five years from one that starts failing in five weeks.
| Zone | What Happens Here | Key Hardware | Critical Rule |
|---|---|---|---|
| Zone 1 — Desktop | Devices, monitors, peripherals. All cables originate here. | Under-desk cable tray, velcro ties, desk grommet | Everything moves with the desk. Nothing anchored to the floor. |
| Zone 2 — Vertical Travel | The transition from desk to floor. Cables must absorb 45–50cm of height change. | Flexible cable spine, spiral wrap, service loop bracket | Minimum 55cm of free loop. Never zip-tied. Never taut. |
| Zone 3 — Floor/Infrastructure | Power distribution and data runs. Static. Never moves. | Under-floor raceway, PDU, floor box, cable tray | Completely separate from Zone 2. Power comes up to the desk — not down from it. |
Zone 1 — The Desktop: Everything Travels with the Desk
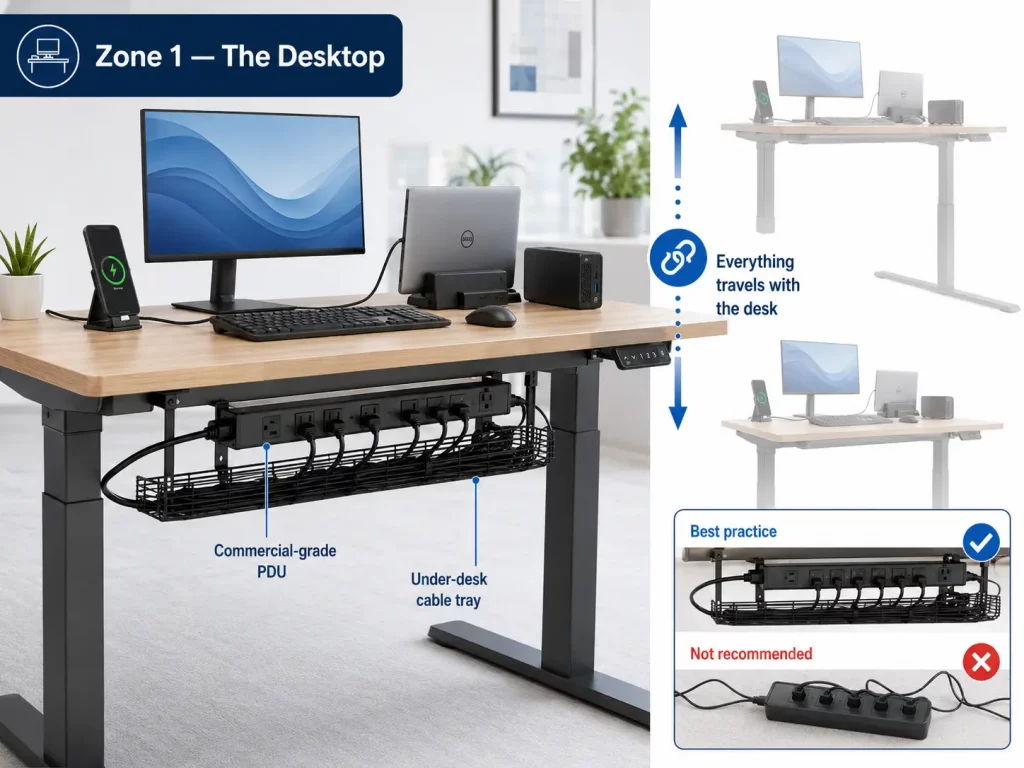
Every device at the desk — monitor, laptop dock, PC, phone charger — is connected and managed as a single travelling unit. The under-desk cable tray (a J-channel or mesh tray bolted to the underside of the desk surface) gathers all device cables and the desk-mounted power distribution unit into a single managed bundle that moves as one assembly when the desk adjusts.
The power distribution at the desk level should be a surge-protected PDU or commercial-grade desk power unit — not a consumer power bar. The distinction matters for two reasons: commercial PDUs have rated duty cycles for repeated power connection and disconnection, and they are designed for fixed mounting to a surface rather than for floor placement where they can be kicked, compressed, or dragged.
Zone 2 — The Vertical Travel Zone: Where Everything Goes Wrong

This is the zone that determines whether your cable management system succeeds or fails. It’s the transition from the moving desk assembly (Zone 1) to the static floor infrastructure (Zone 3) — and it must accommodate the full height range of the desk without ever restricting movement or placing tension on any connector.
The correct hardware for Zone 2 is a flexible cable spine or cable sock — a bundled sheath that holds all cables together in a single flexible column and attaches to the desk leg at the top with a velcro bracket. The bottom of the spine terminates in a floor-level service loop: a managed bundle of excess cable length that sits in a cable containment box or under-desk basket at floor level. As the desk rises, the spine extends and the service loop feeds upward. As the desk lowers, the spine compresses and the service loop retracts. No tension. No fixed constraint points. No zip ties.
For data cables specifically — network, USB-C, DisplayPort — the spine should keep data and power cables in separate compartments. Running power and data in the same tight bundle causes electromagnetic interference that shows up as network instability, monitor flicker, and USB connection drops. This is one of the most commonly overlooked causes of intermittent workstation issues in open-plan offices.
Zone 3 — The Floor Infrastructure: Static, Separate, and Never Touched After Installation
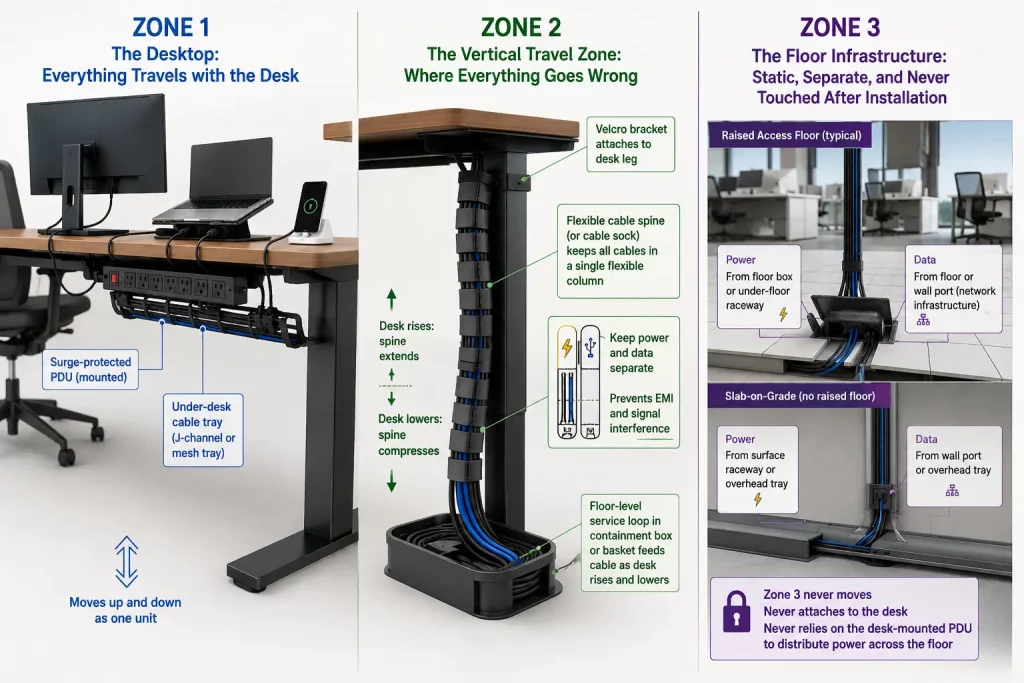
The power and data infrastructure at floor level should be completely independent of the desk. Power comes from a floor box or under-floor raceway directly to the desk — not through a long cord from the desk PDU dragging on the floor. Data comes from a floor or wall port — installed as part of your commercial network cabling infrastructure — directly into the Zone 2 cable spine.
In open-plan offices with raised access flooring, this is straightforward: data and power runs are below the floor, floor boxes are positioned under each desk, and Zone 2 emerges from the floor box straight into the desk leg. In slab-on-grade offices without raised flooring, Zone 3 typically lives in surface-mounted floor raceways or in the overhead ceiling tray — with drops coming down to each desk cluster. The key rule: Zone 3 never moves, never attaches to the desk, and never relies on the desk-mounted PDU to distribute power across the floor.
Scale Guide: The Right Approach for 20, 50, and 100+ Desks
The three-zone system applies at every scale. What changes is the infrastructure complexity, the procurement approach, the project timeline, and the ongoing maintenance model. Here’s how the implementation changes as your office grows.
20 Desks — The Manageable Phase
At 20 desks, a well-organized in-house or single-contractor installation is achievable in one to two days. The infrastructure decisions at this scale are relatively forgiving — mistakes can be corrected without major disruption.
What works at 20 desks:
- Individual desk-by-desk cable spine installation with consistent hardware across all stations
- Commercial-grade under-desk PDUs (6-outlet, surge-protected, surface-mounted) at each desk
- Floor-level containment using J-channel raceway if raised flooring is unavailable
- A single cable length standard across all desks — measure the longest cable run required and standardize all desks to that specification, with excess managed in the service loop
- Colour-coded cable identification — one colour per cable type across all 20 desks, making troubleshooting and replacement a two-minute job rather than an archaeological dig
The 20-desk mistake to avoid: Inconsistent hardware. At 20 desks, the temptation is to buy different cable management components for different desks based on individual layout differences. Resist this completely. Standardization at 20 desks means your maintenance model for the next five years costs almost nothing. Inconsistency at 20 desks means every cable change, desk reconfiguration, or new hire setup requires re-engineering the solution from scratch.
50 Desks — The Infrastructure Inflection Point
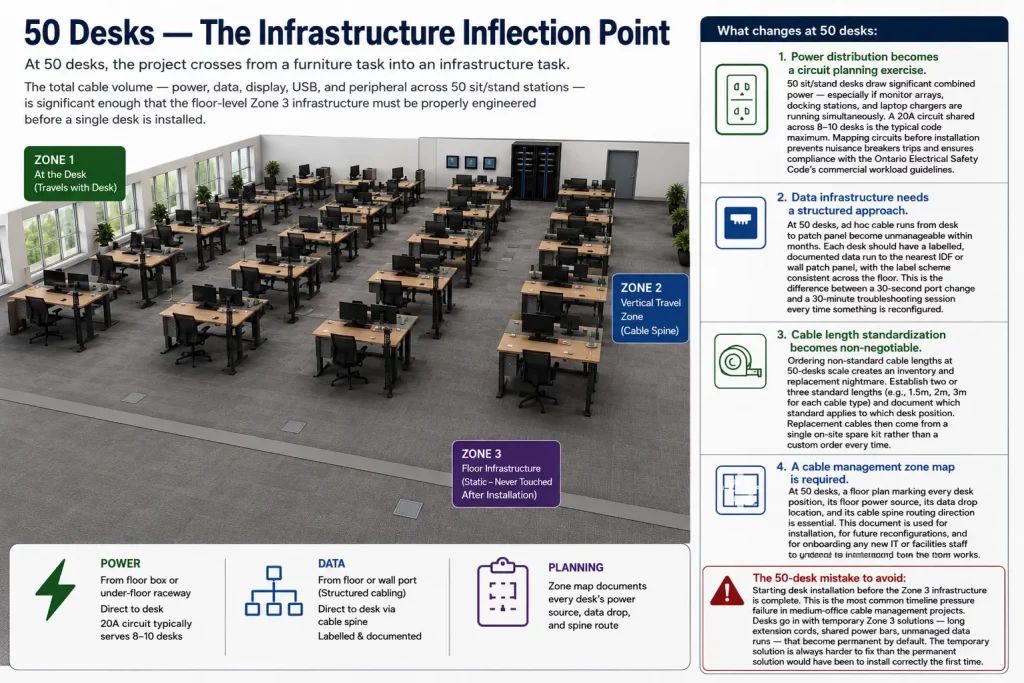
At 50 desks, the project crosses from a furniture task into an infrastructure task. The total cable volume — power, data, display, USB, and peripheral across 50 sit/stand stations — is significant enough that the floor-level Zone 3 infrastructure must be properly engineered before a single desk is installed.
What changes at 50 desks:
- Power distribution becomes a circuit planning exercise. 50 sit/stand desks draw significant combined power — especially if monitor arrays, docking stations, and laptop chargers are running simultaneously. A 20A circuit shared across 8–10 desks is the typical safe maximum. Mapping circuits before installation prevents nuisance breaker trips and ensures compliance with the Ontario Electrical Safety Code’s commercial workload guidelines.
- Data infrastructure needs a structured approach. At 50 desks, ad hoc cable runs from desk to patch panel become unmanageable within months. Each desk should have a labelled, documented data run to the nearest IDF or wall patch panel, with the label scheme consistent across the floor. This is the difference between a 30-second port change and a 30-minute troubleshooting session every time something is reconfigured.
- Cable length standardization becomes non-negotiable. Ordering non-standard cable lengths at 50-desk scale creates an inventory and replacement nightmare. Establish two or three standard lengths (e.g., 1.5m, 2m, 3m for each cable type) and document which standard applies to which desk position. Replacement cables then come from a single on-site spare kit rather than a custom order every time.
- A cable management zone map is required. At 50 desks, a floor plan marking every desk position, its floor power source, its data drop location, and its cable spine routing direction is essential. This document is used for installation, for future reconfigurations, and for onboarding any new IT or facilities staff who needs to understand how the floor works.
The 50-desk mistake to avoid: Starting desk installation before the Zone 3 infrastructure is complete. This is the most common timeline pressure failure in medium-office cable management projects. Desks arrive, the pressure to get staff seated wins over the correct infrastructure sequence, and desks go in with temporary Zone 3 solutions — long extension cords, shared power bars, unmanaged data runs — that become permanent by default. The temporary solution is always harder to fix than the permanent solution would have been to install correctly the first time.
100+ Desks — The Full Infrastructure Project
At 100 desks, every decision made at installation time compounds across the entire floor for five to seven years. A $2 saving per desk on cable management hardware is a $200 saving at installation that becomes a $3,000 maintenance liability over the life of the desk fleet. This is the scale where doing it right is demonstrably cheaper than doing it fast.
What a 100-desk installation requires:
- A pre-installation cable audit meeting. Before any hardware is ordered, every desk position needs to be surveyed: what devices will be at this station, how many monitors, what type of docking or charging, what data connectivity is required. This drives cable specification, PDU sizing, and Zone 3 circuit allocation. Surprises discovered during installation at 100-desk scale are expensive.
- Cluster-based infrastructure design. 100 desks broken into clusters of 8–12, each cluster fed by its own floor box or ceiling drop, each cluster’s Zone 3 fully independent from adjacent clusters. This isolation principle means a failure in one cluster — a tripped breaker, a damaged floor raceway, a failed patch panel port — affects 10 people, not 100.
- A professional cable labelling system. Every cable at every desk labelled at both ends, with a consistent scheme (desk number + cable type + circuit ID). This isn’t an aesthetic decision. At 100 desks, the ability to identify and replace a specific cable in under 5 minutes without disturbing adjacent workstations is worth several hours of IT helpdesk time per month.
- Scheduled maintenance intervals. A 100-desk sit/stand fleet should have quarterly visual inspections of Zone 2 cable spines — checking for fatigue signs, loose velcro brackets, and service loop compression. Most cable failures are detectable before they occur. Catching a fatigued cable at inspection costs $12 in materials. Discovering it when a director’s monitor dies during a presentation costs significantly more.
- A documented as-built record. Every circuit, every data run, every cable type and length at every desk, documented and signed off at project completion. This document is the single most valuable deliverable from a 100-desk installation — and the one most commonly skipped in projects that prioritize speed over sustainability.
The Commercial Cable Management Materials Guide: What to Specify and What to Avoid
| Component | Specify This | Not This — And Why |
|---|---|---|
| Cable fasteners | Hook-and-loop (velcro) reusable wraps, 15–20mm width | Zip ties — create fixed stress points on dynamic cables, must be cut for any change |
| Vertical cable management | Flexible nylon cable spine or expanding spiral wrap, minimum 55cm travel range | Rigid cable channel or fixed J-channel mounted to the desk leg — does not flex with height change |
| Under-desk cable tray | Steel mesh tray, bolt-mounted to desk underside, minimum 100mm wide | Adhesive-mount trays — adhesive fails within 6–18 months under cable weight, especially in air-conditioned offices |
| Desk power distribution | Commercial surge-protected PDU, IEC C13 or Australian/Canadian standard, mount-rated | Consumer power bars — not rated for continuous commercial duty, poor surge protection, not mount-designed |
| Service loop containment | Under-desk cable basket or floor-level cable containment box | Free-hanging service loops — move with air currents, catch on chair wheels, create floor-level tripping hazards |
| Floor/zone 3 raceway | PVC surface raceway, minimum 38mm × 25mm, with separate power and data channels | Single-channel raceway mixing power and data — causes EMI, violates CEC separation requirements in commercial installations |
| Cable identification | Adhesive cable labels, both ends, with desk number and cable type | Colour coding alone — colours fade, differ between product batches, and provide no information during after-hours service calls |
The Safety and Compliance Layer: What Your Facilities Manager Needs to Know
Cable management in a commercial Ontario office is not purely an aesthetic or operational concern. There are compliance dimensions that directly affect your WSIB exposure, your insurance coverage, and your ability to pass a fire marshal inspection.
Ontario’s Occupational Health and Safety Act (OSHA) places a general duty on employers to maintain a workplace free from recognized hazards. Cables crossing pedestrian areas, cables dragging on floor tiles where chairs roll over them, and cables creating tripping hazards in egress paths are all recognizable OSHA violations. After a tripping incident, a documented cable management failure significantly increases your liability exposure in any WSIB claim.
The Ontario Electrical Safety Code (OESC) prohibits the use of extension cords as permanent wiring — a rule violated by approximately 80% of commercial offices in Ontario. If your sit/stand desks are powered by extension cords running from wall outlets to desk power bars, you are operating outside the Code. This is relevant not only during an ESA inspection but in the aftermath of any electrical incident — a fire, an electric shock, or equipment damage — where your insurer may investigate whether the installation met code at the time of the incident.
Your commercial property insurance policy may have maintenance and installation standards clauses that are triggered by electrical incidents in the workplace. A professional cable management installation, documented with an as-built record, is meaningful evidence that due diligence was exercised. A floor full of extension cords and consumer power bars is meaningful evidence that it wasn’t.
Future-Proofing: Designing for Hybrid Work, Desk Hoteling, and Technology Change
The office cable management system you install today needs to accommodate the office you’ll be running in three years. Two trends are changing what that means faster than any point in the last two decades.
Desk hoteling and hot-desking — where no employee has an assigned workstation and desks are booked on arrival — fundamentally changes the cable requirements at each station. A hoteling desk needs a universal docking solution (USB-C Power Delivery dock with monitor, network, and peripheral pass-through) that any laptop can connect to with a single cable. It needs power available for devices of different wattage requirements. And it needs cable management that survives being connected and disconnected by a different person every day — which means velcro, not zip ties, and strain-relieved connectors on every cable end.
USB-C convergence is simultaneously simplifying and complicating desk cable management. As monitors, docks, and peripherals migrate to USB-C and Thunderbolt, the cable count per desk is decreasing — a single USB-C cable can carry power, display, network, and peripheral data simultaneously. But USB-C cable quality varies enormously, and a substandard USB-C cable in a high-wattage charging application is a fire risk that is difficult to identify visually. Specify cables with active e-marker chips for any application above 60W, and standardize on a single quality-controlled supplier across the full desk fleet.
DIY vs. Professional Installation: The Honest Decision Guide
Not every cable management project needs a professional installer. Here’s the honest breakdown:
| Scenario | DIY Works If… | Professional Makes Sense If… |
|---|---|---|
| Under 15 desks, single room | IT staff available, hardware already specified correctly | No internal IT resource or tight deadline |
| 20–50 desks, open plan | Dedicated project manager, 2+ days allocated, Zone 3 already complete | Working around live staff, deadline pressure, or no Zone 3 plan |
| 50–100+ desks, multi-zone | Rarely — scale and compliance complexity make professional specification essential | Almost always — design, procurement, installation, labelling, and as-built documentation all require professional management |
| Existing chaotic installation | If chaos is isolated to 5 or fewer desks | Remediation of a failed installation — easier to replace correctly than to patch incrementally |
Frequently Asked Questions
How much extra cable length do I need for a sit/stand desk?
Every cable that travels with the desk needs a minimum of 50 to 60 centimetres of service loop slack beyond the static connection distance. A cable that reaches its destination at sitting height with 1 metre of length needs 1.5 to 1.6 metres to safely reach at full standing height without going taut. Order to travel length, not desk length. This is the single most important specification decision in the entire project.
Can I use the same power bar for a sit/stand desk as a regular desk?
Consumer power bars are not recommended for commercial office sit/stand deployments for two reasons. First, they are not rated for the continuous commercial duty cycle of an office environment. Second, the power cord from a consumer power bar to the wall outlet is typically 1.5 to 1.8 metres — insufficient to reach a floor outlet from a desk at full standing height without going taut. Specify commercial-grade, mount-rated PDUs at each desk, with Zone 3 infrastructure delivering power to within reach of the desk at maximum height.
Are extension cords allowed in a commercial office in Ontario?
The Ontario Electrical Safety Code prohibits extension cords as permanent wiring in commercial installations. Extension cords are permitted as temporary connections — during a move, during construction, during an interim period before permanent power is installed — but not as a permanent solution for powering workstations. Most commercial offices in Ontario run extension cords as de facto permanent power, which places them outside Code compliance and creates insurance and liability exposure in the event of an electrical incident.
How long does a professional 100-desk cable management installation take?
A 100-desk sit/stand cable management project — including Zone 3 infrastructure assessment, hardware procurement, installation, labelling, and as-built documentation — typically runs three to five business days for an experienced commercial installation team. Projects with tight timelines, working around live staff, or involving significant Zone 3 remediation may run longer. Pre-installation planning and a completed Zone 3 infrastructure are the two factors that most reliably compress the installation timeline.
What is the most common cause of cable failure on a sit/stand desk?
Insufficient service loop slack, combined with zip tie constraint points. When a cable is routed with no free loop and secured with zip ties at fixed points along the desk leg, every height cycle flexes the cable at those fixed points. The insulation fatigues progressively, the internal conductors fracture, and the failure presents as an intermittent connection — intermittent video signal, inconsistent charging, unstable network connection — that is extremely difficult to diagnose without physical inspection. The fix is always the same: remove the zip ties, add a 55cm+ service loop, re-secure with velcro wraps.
Does Cablify manage office cable management projects across the GTA?
Yes — office cable management at commercial scale is a core Cablify service across the Greater Toronto Area, covering sit/stand desk fleets from 10 to 200+ stations. We handle everything from pre-installation audit and Zone 3 infrastructure assessment through hardware specification, installation, labelling, and as-built documentation. We work around occupied offices, accommodate tight timelines, and guarantee a clean, compliant, documented result. Contact us for a free on-site assessment.
Ready to Do This Right — Once?
The offices that get cable management right don’t think about it again for five years. The offices that get it wrong are re-doing it annually — one broken cable, one tripping complaint, one fire marshal notice at a time.
At Cablify, we design and install commercial cable management systems for offices across the Greater Toronto Area. Sit/stand desk fleets, open-plan reconfiguration projects, office fit-outs, and cable remediation for existing installations that never got done properly — we’ve done all of it, at every scale, working around live staff with minimal disruption to your operations.
If you have 20 desks or 200, if your timeline is May 15 or next quarter, if you’re starting from scratch or trying to fix what someone else left behind — contact Cablify today for a free on-site assessment. We’ll tell you exactly what the project involves, what it costs, and how long it takes. No surprises on installation day.